Odoo Accounting Data Migration Checklist
Relokia's Migration Wizard can assist you in quickly starting your data migration to Odoo Accounting from another accounting software. With our data migration service, you can seamlessly transfer various data types to Odoo Accounting, including contacts, invoices, bills, and more. To prepare your target platform for the data import, we recommend following our instructions.
What accounting records can you import to Odoo Accounting?
| Entity | Status in a default migration |
| Customers | Available |
| Vendors | Available |
| Accounts | Available |
| Products | Available |
| Invoices* | Available |
| Expenses* | Available |
| Bills* | Available |
| Purchase orders* | Available |
If some entities aren’t migrated in a Free Demo or listed here, contact our team for more details.
Preparation tips for your accounting migration
To prepare your Odoo Accounting account or the migration process, run through the steps:
1) Make all possible fields non-mandatory, in the Accounting tab of your account locate all edible fields and make them non-mandatory. This will help ensure that data is accurately transferred during the migration process.
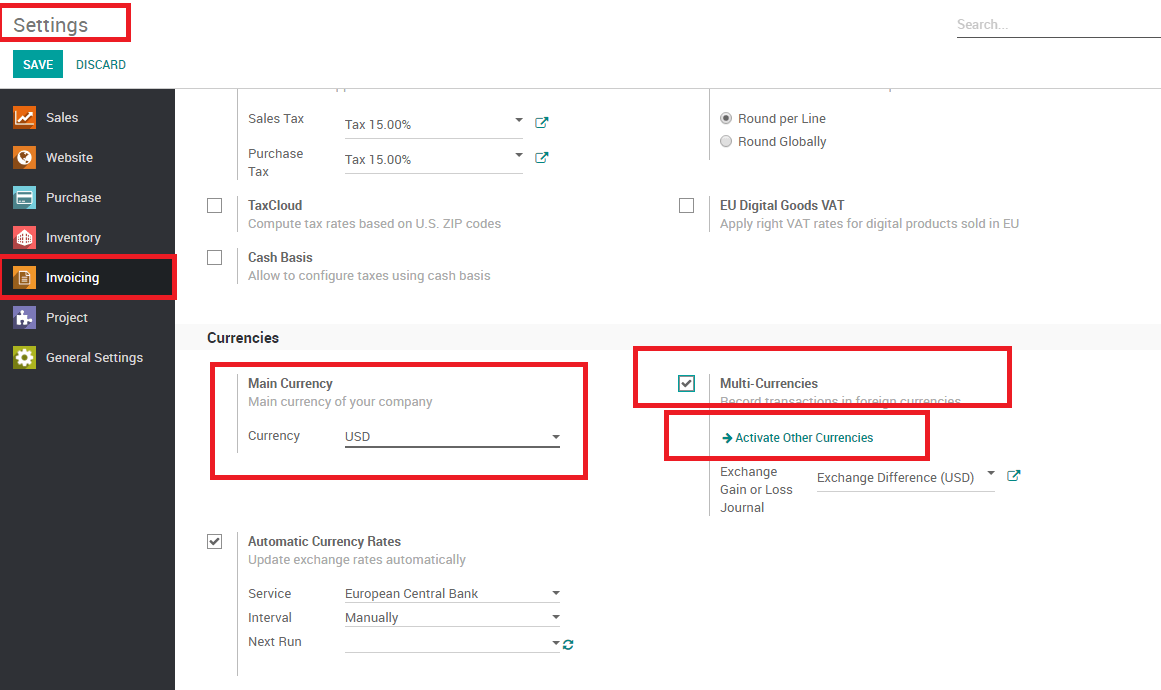
2) Add the needed currencies. To ensure a seamless transition, you need to add the same currencies on your source platform to Odoo Accounting that are currently used in your source platform. To do so, follow this guide:
- Go to Settings.
- Under Settings, choose Invoicing.
- Scroll down to Currencies.
- Check the Multi-currencies option.
- Click on Activate Other Currencies and choose the needed ones.

3) Configure a default account in Sales Journals. To do so, follow the instructions:
- Open up Configuration → Journals.
- Select the Journal with the type “Sales.”
- Click Edit and choose Default Income Account.
4) Add modules for Expenses and Purchases. You need to install specific modules on your Odoo account to migrate expenses and purchases.
To install modules for Purchases and Expenses:
- Open the Home menu in the left corner.
- Navigate to Apps and find Inventory.
- Install a module for Purchases by clicking INSTALL and then CONFIRM.
- Repeat the same steps to install the module for Expenses.
Starting a free Demo Migration
It's best to start with a Free Demo Migration to ensure a successful transfer of your data to Odoo Accounting. The Migration Wizard will import a small sample of your data to give you a chance to preview how it will appear in Odoo Accounting.
1. Collect access credentials
To import your data to Odoo Accounting, you need to provide a URL, Database name, email address, and password.
To find your database name, you need to create it first. Then follow these steps:
- Click on the profile icon in the right corner.
- Choose the Database you want to use for data import.
- Find your subdomain under your Company Name.
2. Run a Free Demo Migration
During a Demo Migration, the Migration Wizard transfers a small sample of your data from your current platform to Odoo Accounting. Also, you can edit settings and restart your Demo if needed.
- Log in to the Migration Wizard or sign up for an account.
- Connect your source and target accounting platforms.
- Select the entities you want to import.
- Click "Continue" to start the Free Demo Migration.
- Review the results on Odoo Accounting.
- Choose a support package that meets your needs.
3. Review the migration results in Odoo Accounting
Review a table with four columns as soon as your Free Demo is complete:
- all available records
- migrated records
- failed records
- skipped records
Check reports of migrated, failed, and skipped records. Compare record IDs on both accounting systems. Carefully review each record before proceeding with a Full Data Migration.