Xero Data Migration Checklist
Make a seamless transfer from your current accounting software to Xero with Relokia’s Migration Wizard. Discover the data you can import to Xero and the step-by-step instruction to migrate it from any supported accounting tool. Don't waste time manually entering data—let our Migration Wizard streamline the process and get you up and running on Xero in no time.
What data can you import to Xero?
| Entity | Status in a default migration |
| Customers | Available |
| Suppliers | Available |
| Accounts | Available |
| Products and services | Available |
| Estimates | Possible in a custom work |
| Invoices* | Available |
| Invoice credits* | Available |
| Bills* | Available |
| Bill credits* | Available |
| Purchase orders* | Available |
| Transaction | Available |
If some entities aren’t migrated in a Demo Migration, aren’t included in this list or have a status “Possible in a custom work,” reach out to our team for more details.
Preparation tips for your accounting migration
Proper planning and preparation are crucial for a successful Xero migration. To facilitate a seamless accounting data import, review the following checklist:
1. Navigating the accounting migration peculiarities
Before migrating your accounting data to Xero, consider the following peculiarities:
- Expenses won’t migrate to Xero in a default migration.
- Accounts shouldn’t be archived after the Demo Migration since Migration Wizard maps them during the Full Data Migration to avoid creating duplicates. If you archive the accounts, the Migration Wizard can neither map nor copy them again.
- The Migration Wizard can’t create repeating invoices.
2. Prepare Xero for your accounting migration
To guarantee a smooth accounting migration to Xero, make necessary preparations on the platform beforehand. Run through the following steps to ensure readiness:
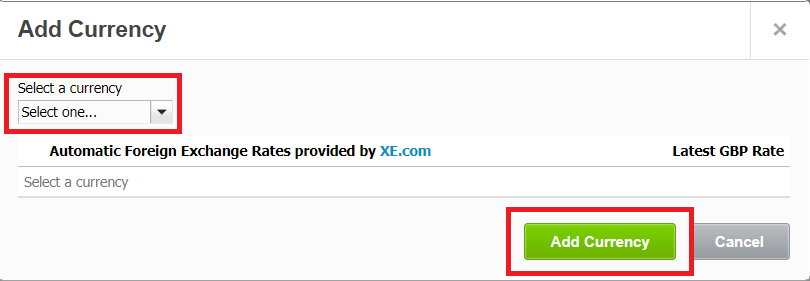
1) Add the source currencies on Xero. If you're already using Xero, ensure that the operations are supported with the currencies used on the source account to avoid the error "Organisation is not subscribed to currency." Follow these steps:
- Open your company in Xero.
- Go to Settings.
- Under General, select Currencies.
- Click + Add Currency under the Currency section.
- Select the necessary currency from the drop-down menu, then click Add Currency.
- Repeat this process to add every currency you have on your source platform.

2) Disconnect Accounting & Invoicing data migration (optional). If you want to migrate multiple sources to Xero into a single organization, disconnect our tool. Here’s how:
- Go to the Organization settings.
- Under General, select Connected Apps.
- Choose Accounting & Invoicing data migration and click the Disconnect button.

Starting a Free Demo Migration
Before proceeding with a Full Data Migration, try a Free Demo first to see automated service in action. The Migration Wizard imports a small portion of data to allow you to preview how it appears on Xero.
1. Collect access credentials
When setting up a Demo Migration, you need access credentials to your source platform and Xero. To connect to Xero, follow these steps:
- Undergo the OAuth authentication with your email address and password.
- Configure the connection by selecting the necessary organization.
2. Run a Free Demo Migration
Start your Free Demo Migration to see how the Migration Wizard works and preview how your accounting data will look on Xero. You can reset your Demo by applying different settings as many times as you need.
- Log into the Migration Wizard or create an account.
- Connect your source and target accounting systems.
- Select the data entities you want to import to Xero.
- Click Continue to launch a Free Demo Migration.
- Check the Demo migration results.
- Pick a suitable support package.
3. Review the migration results in Xero
Once the Free Demo is completed, review a table with the following columns:
- all available records
- migrated records
- failed records
- skipped records
Following the accounting migration process, you can download reports on migrated, failed, and skipped records to review the outcomes. Copy the record ID on the source platform and Xero to compare them. Carefully examine each record closely before proceeding with the Full Data Migration.