QuickBooks Online Data Migration Checklist
To migrate your accounting data from another software to QuickBooks use Relokia’s Migration Wizard. The automated migration service, with easy setting up and a free testing option, will help you get started quickly. In this data migration checklist, we’ll explore the types of data that can be imported to QuickBooks Online and provide step-by-step instructions on migrating it from any supported accounting tool.
What data can you import to QuickBooks Online?
| Entity | Status in a default migration |
| Customers | Available |
| Suppliers | Available |
| Accounts | Available |
| Items | Available |
| Estimates* | Available |
| Invoices* | Available |
| Credit memos* | Available |
| Sales receipt* | Available |
| Expenses* | Available |
| Bills* | Available |
| Vendor credits* | Available |
| Purchase orders* | Available |
| Transaction | Possible in a custom work |
If some entities aren’t migrated in a Free Demo and/or not listed, or have a status “Possible in a custom work,” contact our team for more details.
Preparation tips for your accounting migration
When it comes to migrating your accounting system, thorough planning and preparation are essential for success. To help ensure a smooth data transfer, consider the following checklist:
1. Navigating the accounting migration peculiarities
Before importing data to QuickBooks Online, be aware of the following:
- Recurring invoices won’t be imported in a default migration.
- In Custom Data Migration you can transfer the original invoice numbers.
- Taxes aren’t migrated to QuickBooks Online, but they’re included in the price of Items.
- The price of items transferred to QuickBooks Online, containing both taxes and discounts.
- When the Migration Wizard creates a payment to a specific entity, a transaction automatically appears. But it isn’t possible to confirm this transaction with the API. That’s why transaction statuses don’t migrate correctly. So, you should manually change them for the transactions that have already been paid and registered with the bank. This way, they won’t be tracked again.
2. Prepare QuickBooks Online for your data migration
To ensure a successful accounting migration to QuickBooks Online, it's important to prepare the platform beforehand. Here are some steps you should take to get ready:
1) Set up Expense Accounts to migrate estimates properly.
- Click on the gear icon and select Company Settings.
- On the left menu, select Expenses.
- Under the Bills and expenses section, find Track billable expenses and items as income and items as income and click on In multiple accounts.
- Choose Use for billable expenses and select an income account to assign to it.
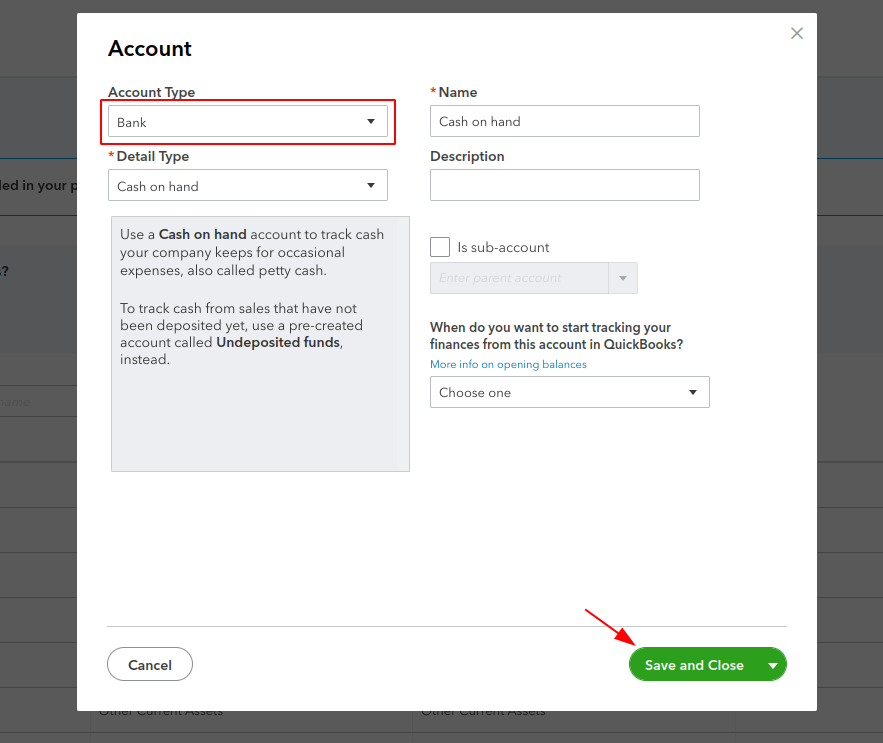
2) Create a payment account with an account type “Bank” to connect QuickBooks Online as a target platform.
To create a payment account, follow these steps:
- Click on the gear icon in the right-top corner.
- Switch to the Accountant view in the Settings window.
- Under Accounting, select Chart of accounts.
- Click on the New button in the right corner.
- Choose an account type “Bank” and a detail type “Cash on hand.” Then, fill in the Name field.
- Press Save and Close to apply the new settings.

3) Switch the Invoice no. field. By default, the Invoice Number field may be hidden in QuickBooks Online. To make sure the imported invoices display the invoice numbers, follow these steps:
- Click on the gear icon, then select Account and Settings.
- Go to the Sales tab and expand the Sales form content section.
- Check the box next to Custom transaction numbers.
- Click Save to apply changes.

4) Turn off Automatically apply credits/bill payments. QuickBooks Online has automation features that may interfere with the imported data. Follow this guide:
- Click on the gear icon in the right corner, then under Your Company, choose Account and settings.
- In the left sidebar, select Advanced.
- Scroll down to the Automation section and click on the pencil icon to edit it.
- Turn off automation for “Automatically apply bill payments” and “Automatically apply credits.”
- Click on Save to apply changes.

Starting a Free Demo Migration
Instead of jumping into a Full Data Migration, run a Free Demo. The Migration Wizard imports a small amount of data to check how it looks on a target platform.
1. Find access credentials
To test drive our Demo Migration, you’ll need access credentials to both your source accounting system and QuickBooks Online. To connect QuickBooks Online, you need to:
- Password and email address to undergo the OAuth authentication.
- Configure the connection by selecting income accounts, expense accounts, and payment accounts.
2. Run a Demo Migration
With a Free Demo Migration, you can test how the Migration Wizard works and how your source accoutning data will look on QuickBooks Online. You can restart the same Free Demo with new settings as often as needed.
- Sign in to your Migration Wizard or create an account.
- Connect your source and target accounting systems.
- Choose the data you want to import.
- Start your Free Demo Migration.
- Check the migration results.
- Select a suitable support package.
3. Review the migration results in QuickBooks Online
Once the test import is complete, check out a table with four different columns:
- all available records
- migrated records
- failed records
- skipped records
You can download reports on migrated, failed, and skipped records to check the results. You can copy the record ID on the source and target platforms and compare them. Carefully check every record before the Full Data Migration.